Showing posts with label Tutorial. Show all posts

Wednesday, 25 December 2019

C++ Programming : SDL2 Graphics Rendering Loop

Today, it's a bit of a programming ramble, I'm literally throwing this code together, from memory and the docs... What does it do?

Well, I set up an SDL2 based graphics project.  Added font loading and set up the compilation environment and get something updating on screen, at the end there's then a second short video debugging a flickering... or if not properly fixing it, I at least start to pull the thread as to what is going wrong.

You can find the final code here: https://github.com/Xelous/Frog


And the short follow up:


Saturday, 21 July 2018

C++ : Coding Standards by Example #1 (with Boost Beast)

Today I've spent sometime doing a little different video, rather than just play about in code, whilst I played about I made a video of the time I had... Here is it...


We cover:


  • C++
  • Coding Standards
  • Structured Programming
  • Functional Programming
  • Encapsulation
  • Object Orientated Programming
  • Building the Boost Libraries (1.67.0)
  • Visual Studio 2017
  • Static Linking

And generally spend time seeing how I turn gobble-de-gook code into something usable and maintainable against my own Coding Standards.

Get the code yourself here: https://github.com/Xelous/boostBeast

Thursday, 19 July 2018

C++ : Copy Constructor versus Ignorance

I've spent a bit of time reviewing someone else's code recently and I've come to an impasse with them, so they have a lot of code which will take some standard container, and the code doesn't just initialise the local copy from the passed in reference... No it'll iterate over the list of elements adding them to the class version.

I have picked fault with this, it's not RAII, it looks ugly and if you're threading you can create your class instance and the member is empty or in a partially filled state before the loop within the constructor is finished... I highlight this in red below...

My solution?  Just initialise the member from the reference - see the green highlight in the code below.

My results from the timing below?


These times are "microseconds" so tiny... But with just constructing from the existing reference we always get a lower time, quicker code...


Running this test 30,000 times, trying it in different orders and with maps of upto 1000 elements I had a rough average increase of 60% speed by using the copy constructor of std::map rather than reallocating new memory for each pre-existing element.

I wanted therefore to understand the reasoning behind the original code, was there some reason to perform a clone (alloc and assign new instance) operation for each pair in the map being passed in?  Looking at the code there was no apparent reason, so I spoke to the developer, asking why they had performed the construction in this manner... Their reply...

"That's how you initialise a container"

You can load up a container in this manner, but you already have the contents of the map, you're just copying it... "Why don't you use the copy constructor?"... I asked...

"I didn't write one"

Hmm, "You don't, the compiler generates it for you, std::map has its own copy constructor".  Use the copy constructor folks, trust me.


#include <map>
#include <chrono>
#include <string>
#include <iostream>


using Mapping = std::map<int, int>;

class A
{
private:
Mapping m_TheMapping;

public:

A() = delete;
A(const A&) = delete;
void operator=(const A&) = delete;

A(const Mapping& p_Mapping)
:
m_TheMapping(p_Mapping)
{
}

A(const Mapping& p_Mapping, const bool& p_Other)
:
m_TheMapping()
{
for (auto i : p_Mapping)
{
m_TheMapping.emplace(i);
}
}

inline Mapping& Mapping()
{
return m_TheMapping;
}
};


int main()
{
Mapping l_m
{
{ 0, 0 },
{ 1, 1 },
{ 2, 2 },
{ 3, 3 }
};

auto l_time(std::chrono::high_resolution_clock::now());
// Copy Construction
A l_map(l_m);
auto l_timeB(std::chrono::high_resolution_clock::now());

auto l_Dur(l_timeB - l_time);
std::cout << std::chrono::duration_cast<std::chrono::microseconds>(l_Dur).count() << std::endl;


auto l_time2(std::chrono::high_resolution_clock::now());
// Clone Construction
A l_map2(l_m, true);
auto l_time2B(std::chrono::high_resolution_clock::now());

auto l_DurB(l_time2B - l_time2);
std::cout << std::chrono::duration_cast<std::chrono::microseconds>(l_DurB).count() << std::endl;
}

Wednesday, 3 January 2018

Ultra Cheap ZFS Array

Make your own ZFS array (mirrored) with USB Flash drives, for cheap!


Since this... interesting post of mine... has only about 10 views, and my tech items usually get a few hundred, I figure somewhere along the lines it got trampled by my silly New Years post....

Sunday, 31 December 2017

Using Flash Drives in ZFS Mirror

This post comes from an idea I had to allow me to easily carry a ZFS mirror away from a site and back again, we didn't need much space - only 5gb - but it had to be mirrored in triplicate, one copy to stay locally, one going into a fire safe on site and the third to be carried by the IT manager off-site each evening.

The trouble?  A near zero budget, so for a little over £45 we have a 14GB ZFS mirrored pool, across three 16 GB USB Flash drives and one three port USB 3.0 hub.

It was perfect for the task at hand, extremely portable, and cheap, I thought the same approach may help anyone trying to get to learn a little more about ZFS, a student or even someone using a laptop as a small office server - as the laptop literally has its own battery back-up system built in!

It's not the fastest solution, its in fact extremely slow, but as an entry step it's perfect.

See the full video below, throughout the commands I list were in use...


Commands:

Listing Disks by ID...

ls /dev/disk/by-id

Listing Disks to a file for use in a file script as you see me using...

ls /dev/disk/by-id -1 > disks.txt

------------------

To install ZFS on Debian/Ubuntu linux:

sudo apt-get install zfsutils-linux

------------------

To remove & purge ZFS from your system:

sudo apt-get purge zfsutils-linux

(and you will be left with "/etc/zfs/pool.cache" to remove or back up yourself).

------------------

Command to create the pool...

sudo zpool create <Name> mirror <DiskId1> <DiskId2> etc...

The name we had here was "tank", if you already have data on these disks you will need to add "-f" to force this change through.

------------------

Command to make a file executable - like our sh script:

sudo chmod +x <filename>

------------------

Zpool Commands:

sudo zpool status

sudo zpool import <name>

sudo zpool scrub <name>

sudo zpool clear <name>


You will want to "import" if you completely remove ZFS or move one of your sticks to a new machine etc, simply insert the disk and import the pool by name.

Scrub will be used whenever you return a disk to the pool, remember the point here is to allow you to replicate the data across the three sticks and be able to remove one or two to safe keeping, be that an overnight fire safe, or taking a physical copy with oneself.

Clear is used to remove any errors such as the Pool becoming locked out for writing - which it may if a drive, or all drives are removed - you simply clear the current problem with any pool.


Summary:  Remember this is NOT the optimum way to run ZFS, this is actually extremely slow, you are replicating each write over your USB, you can only cache so much in the RAM, but it is not a performance piece, this is about ensuring one replicates data for safe keeping, a small office or your dorm room server setup could be completely provided by a laptop in this manner, it has it's own battery backup, it is quite (if you get the right machine) and really this is a very cheap way to play with ZFS before you move onto other bigger hardware options.  Plus, I find the best way to learn about technology is to break it, even a little, and so constantly breaking down your pools by pulling USB sticks out of them is an excellent opener to recovering your pools.  Play about first, don't put anything critical on there until you're really happy with the results.

For an excellent post covering creating ZFS pools, cheak out programaster's post here: http://blog.programster.org/zfs-create-disk-pools

And for the official ZFS documentation you can check things out with oracle here: https://docs.oracle.com/cd/E26505_01/html/E37384/toc.html


Oh, and Happy New Year... I guess I made it to 100 posts this year...

Saturday, 9 December 2017

Start C++?

I've been writing C++11 or better code, well since 2010, as I started doing so with the TR1 as was.  We're nearing eight years since then, and it starts to show.

So, where would I recommend starting to learn modern C++?  Well, if you've never programmed before, don't start by learning C or C++, go learn Pascal, or Python, or something else which is more friendly.  I started out in Pascal, for a good three years, before I started to work in C and later moved into C++ (in 1998) so if 20 years of C++ teach me anything, it's don't try to learn if as your first language.

Once you have a concept of how to program, then start to learn C++, and I would recommend finding someone - hopefully like me - and asking them.  An hours chat with them, to help swap what you know with what they know, is a good start.

Saving any such friends, YouTube, watch CPPCon, BoostCon, watch talks about programming C++ but most importantly get a development environment and cut some code, if you must go for a community edition of Visual Studio 2017, but otherwise get a Linux machine up and running and have a play.

If you work in an office where there's a C++ guru, ask them, if they're worth their salt they'll be more than happy to take you through a few things.

And failing that, I include a set of programs below, one through three, these are the most simplistic C++ programs I would recommend you start off working with, and if you want to know more comment below.


So, open an editor, and write this C++ code, then save the file as "main.cpp":

#include <iostream>

int main ()
{
   std::cout << "Hello World";

}


If you are in Visual Studio, you run that file, if you're in linux close the editor after saving and lets use the gnu g++ compiler (install it in Ubuntu say with "sudo apt install g++"), and you compile this into a program like so:

g++ main.cpp -o example1

Your program output will be called "example1", and you can run that program, and it'll say "Hello World".

The code itself I want to only explain the first line... the include, this tells the compiler to include some code for you to use, and "iostream" is the input/output streaming functions for you.

int main is the first function the program starts to run from, int is the return type, meaning integer, but in C++ we don't need to return a value here - if anyone argues with you about this, they're wrong.  The name "main" is the a special name and the compiler makes sure your program starts with this function entry point.  The empty brackets show we're not passing anything into the function, there are no parameters.

The braces mark out the body of code for the main function, so it starts with an open brace, contains lines of code and then ends with a close brace, and yes I call them "braces" not "curly brackets" :)

The one and only line of code we've got left is the output call, this is streaming the value on the right of the "<<" chevrons to the standard character output stream... "std::cout"... I'll reiterate 'standard character output stream".   And the value we're streaming is a string (note the quotes in the code) "Hello World".

This is the only line of code with the all important semicolon ending, this is used to tell the compiler that we're done with out line of code.

Go, try this...


The next most basic program for C++ noobies to learn, is to maybe output some more kinds of data.... After say, asking the user something...We've seen cout, how about "standard character input"?...

#include <iostream>
#include <string>

int main ()
{
    std::cout << "What is your name? ";
    std::string name;
    std::cin >> name;
    std::cout << "\r\n";
    std::cout << "Oh Hi " << name;
}

We're introducing a new header, the "string" header helps us store strings of characters in the type "standard string"... "std::string"... Did you spot that?... This is our first variable, and it has the name "name" so we can refer to it later.

As ask the user a question by sending characters out "<<" to the output stream, and then we read them back in ">>" from the character input stream, and we read them into the "name" variable we just created.

Next we output a carriage return "\r" to move our carat back to the left of our screen, and we move to the next line "\n".

And finally we output a piece of text AND our input variable!

You can play with this code with other variable types, other than string... Try "int" to read in a whole number, of "float" to read in a floating point number.


But our third program, will involve some actual processing.... Lets average the age of a set of people we ask the user to input...

#include <iostream>

int main ()
{
    int TotalAge (0);

    int age;
    std::cout << "Enter the name of person 1: ";

    std::cout >> age;
    TotalAge = TotalAge + age;
    std::cout << "\r\n";

    std::cout << "Enter the name of person 2: ";
    std::cout >> age;
    TotalAge = TotalAge + age;
    std::cout << "\r\n";
    
    std::cout << "Enter the name of person 3: ";
    std::cout >> age;
    TotalAge = TotalAge + age;
    std::cout << "\r\n";


    float Result = TotalAge / 3;

    std::cout << "The average Age is: " << Result
}

Here we have much more code, we ask for each persons age, adding it to the total, then we calculate the resulting average age and print it out.  Take a moment to look at this....

What do you see?  If the first thing you see is that there are three sets of the same code in there, then you have the seed of a programming within.  If however you just see a mess, then maybe C++ isn't for you.


Thursday, 4 May 2017

Software Engineering : My very bad way to set up makefiles

I may have wrote this post, but I'm just being lazy... Read on.

I've made other Boost videos, and other codeblocks videos, and I've always assumed that the user at the other end was well aware of how to compile & build code.

However, it seems there are lots of users whom are not aware of how you actual create a program from source code, at least not with C++.

So I'm going to show you the absolutely most wrong basic way of creating and using a makefile to perform a build...

The first step of C++ program creation, is that trivial matter of creating the source code, easy right?... Yep, so lets skip that step, and go to when its once  and we want to pass the code through a compiler, the compiler turns the source not into a program, but into an intermediary format called an object file or object code.

The compiler then leaves the process and another program takes over, this second program is known as the Linker, and it takes the object code and links it with all the system calls and other libraries you are wishing to use.

There are other steps involved in the process of building a program, however, compiling & linking are the two main steps; when I began programming you were made very much aware of this by the compiler and linker generally being such large complex programs and the libraries being so big you had to physically change floppy disk between the different steps of the process.

This process was also taught to me in school & later college, it was common practice to understand a compiled program was actually compiled then linked.

Unfortunately, this knowledge seems to have fallen in to the way side, it is of course more important to learn how to program than be bogged down in minutia, however, once you have learned I strongly believe you should expand your knowledge and really have a holistic knowledge of the craft of programming.

So, back to our program, the make file, what might they look like? Well they are simply text files,  which contain commands very similar to bash script... We call this make file script by passing it to the "make" program, you can get make for Linux, mac or alongside MinGW for windows.

Lets start writing a make file for any basic C++ program, which links the Boost libraries we've built somewhere on disk, and which looks like this:


#include <iostream>
#include <string>
#include <boost/filesystem.hpp>


int main (int p_argc, char** p_argv)

{
     if ( p_argc > 1 )
     {
          std::cout << "File or Folder ";
          std::string l_pathString(p_argv[1]);
          boost::filesystem::path l_path(l_pathString);

          if ( boost::filesystem::exists(l_path) )
          {
               std::cout << "Exists!";
          }
          else
          {
               std::cout << "Not Found";
          }
          std::cout << std::endl;
     }
}

Save this as "main.cpp" and then define a variable called "FILES" into which we place this filename.

FILES=main.cpp

We want to start our make file with a variable which contains the compiler we wish to use, for Linux on my test machine I'll use "g++".

CC=g++

So now we have a value called "CC" which is a string of characters with the value "g++".  The dollar sign indicates that "CC" is a variable within the script, which we might want to use later, I use these kind of variables throughout makefiles so I can place at the top any paths or references I like, or I can alter them when I move the makefile from Linux to say Windows, without needing to change hundreds of places throughout the script, I can change just one location.

I find this working with strings is 95% of what working with makefiles is about, next in the file we then define the strings for where to find both the boost headers and the binary libraries are...

BOOST_INC=/home/xelous/boost
BOOST_LIB=$(BOOST_INC)/stage/lib

Notice, I create the root folder for boost as one variable, and then in the next line I use that variable to extend into the "stage/lib" folder, so I never duplicate the root folder for the boost libraries.

We can now define at least our build command, slightly different the command is a verb, in this case "build", which is the command we will use here, but which is also the default.  If you save this makefile as "makefile" in a folder, then navigate your console to that same folder and type "make", the make program will look for "makefile" by default, find it and build the "build" verb by default!

build: 
   $(CC) -I$(BOOST_INC) -L$(BOOST_LIB)

So, what is this command doing?  Well it is saying to use the compiler, with the Include folder for boost and look for libraries in the boost library folder we've set.


The "-I" and "-L" parameters are the same parameters one would use on the command line for "g++".  This command therefore equates to "g++ -I/home/xelous/boost -L/home/xelous/boost/stage/lib", but I think you will agree it is somewhat easier to manage.

We also need to tell the program to link against some libraries, and that we want them linked statically in this case.   So our next variable will be called "CFLAGS1" to pass the Compiler flags to the command.  Back at the top of our make file I therefore add....

CFLAGS1=-fpermissive -Wl,-Bstatic

This file tells the compiler to be permissive of some common errors and treat them as warnings.  You can use whatever parameters you wish for your compile, the flags available and their meaning are quite varied, however you will need to use a second set to within the build command, so lets define that now....

CFLAGS2=-static-libstdc++ -std=c++14

The second tells the compiler and linker to link against the static versions of the libraries we select later, you will need to look at the boost invocation pages in order to go back over our previous posts and build boost static and take advantage of this option.

I'm not going to explain static linking here, nor any of the other switches, available.

Now we're linking the C++ standard library, and boost, statically we need another variable with the list of libraries to link, on the command line to g++ this is with the "-l" (lowercase L), except with we are going to make the program threaded, so we can set up a new makefile script variable called "LIBS", into which we set the libraries, like so.

LIBS=-pthread -lboost_signals -lboost_system -lboost_filesystem

We now have the compiler, the folders, the libraries, the flags... What about the target file for the build?... Well I want it to be an executable called "
fredrick".

TARGET=-o fredrick

Now we need to put this all together into a command, just running the script with the variables does nothing, we need to define a verb... Lets call this "build" a verb in the makefile has to have a colon following it...

build:

And we can tell make what to perform for a build:

build: 
   $(CC) -I$(BOOST_INC) -L$(BOOST_LIB) $(CFLAGS1) $(FILES) $(CFLAGS2) $(LIBS) $(TARGET)

We might also want to clean the project, so we'd want to delete the target file maybe, by adding another verb:

clean:
   rm $(TARGET)

We can then perform the call "make build" or "make clean" in the folder with this makefile and perform our build.

A bit rough and ready, but it works to get you up and running.

Thursday, 29 December 2016

Announcement : My Book On Kindle!

You can pre-order my Kindle e-book today for delivery the 1st of January 2017!


For all those times you wonder about not knowing quite how to approach programming, or if you've lost your confidence with overly technical tomes trying to teach you, try my personal, one to one approach!

The text takes on the same format as the books I learned to program from in the 1980's, it helps you understand the basics never throwing into fits of rage or despair, I am right there with you to guide you.

This is the first book in what I hope to make a series, it takes you through basic variables, numbers, math, text processing, into the basics of lists and then object orientated programming, ending up with error handling and file processing.

I think the Python programming, despite a few quirks, is an excellent starting point for any beginner today, it lends itself to introducing programming across multiple platforms oh so very quickly, but one can still find jobs out there specifically requiring Python skills!

Pre-Order today!  And I'll see you inside!


Monday, 19 December 2016

Programming : Using Boost File System Directory Iterator to Find a File

PLEASE NOTE, THIS POST CONTAINS UPDATES TO PREVIOUS POSTS - BOOST 1.62.0 NO LONGER TAKES THE "MinGW" DIRECTIVE, TO USE MINGW YOU NOW ONLY NEED PASS THE "GCC" DIRECTIVE; see section 5.2.2 at this link...

Today I'm going to do some code, this is a code example with Code::Blocks using the Mingw compiler on Windows, to build the boost libraries and then use the boost.filesytem library to find a specific file from a given root, first just looking in that directory at all its files and the finally making it recurse down the tree of files.

First things first, lets create a folder to work in, I'm going to call it "FindaFile", inside this I'm going to create "ext" for external items, which is where I'll place & build boost; and I'll create "src" for source which is where our project file & source code will reside... Lets get started...

Next...


Extract the boost library, I happen to be using 1.62.0, which is the current version at the time of writing... And I then need a command prompt which knows the location of the compiler for mingw (i.e. we've added it to the PATH environment variable)...


We're preparing to build boost with the mingw toolset...


And then performing the boost build, which on this machine is going to take a long time as I only have 2gb of RAM... Hit that donate button to help me improve some of my machines!


So the path was set, the bootstrap is performed:

bootstrap gcc

and then I start the build

b2 toolset=gcc


Once the build is complete the two folders we will be using in our code-blocks project are the "boost" folder within the boost_1_62_0 folder; this contains all the header files for the boost library.  Some of the libraries are header only, so just including this folder into your builds (on gcc with "-I /foldername/") is enough to use boost, items like "lexical_cast" are perfect examples of this.


The other folder is the "/stage/lib" folder, this will contain all the build library binary's.  When you are using the file system it is not a header-only library, you must link against the "boost_filesystem" library file, and this is where it will reside!

You can leave the boost build running and open Code::Blocks now...


And create a new project, with a little bit of normal code, to check everything is working & we have set it to use C++11 (I would like to use a newer C++, but I only have this old compiler installed)....


Now, lets set the build options in the project...


I am going to set C++11, all warnings and stop on fatal errors...


Then I am going to set the compiler to look in the boost folder for the headers...


And now we tell the linker were to look for the libraries....


Our final step is to tell our program to use the filesystem library, when doing this you also need to use the system library... So lets switch to the linker settings and insert those libraries...

Now, the file name we are going to add is:

libboost_system-mgw47-mt-d-1_62.a

Lets break this down, from left to right we are told the this is part of the boost library "libboost" that is is the "system" sub-library, that it was build with "mingw v4.7", that is it the multi-threaded library, that it is built "debug" and it came from boost v1.62... You need to know this, because in our previous pages you will see we ONLY set our search directories and settings for the "Debug" version of the project... When you switch to the clean, smaller, faster "Release" build you will need to set everything again!

We add this library then into the linker settings, within the link library section... We need to add this file and the filesystem file...


The IDE might ask you to add the library as a relative path, this is directly pointing to the file, and I personally do not advise this, as we've set up the "search directories" we need only enter the filename into the library list.

Now, once the boost build is completed in the background, we can use the boost file system library in our code, and check for the presence of a file....


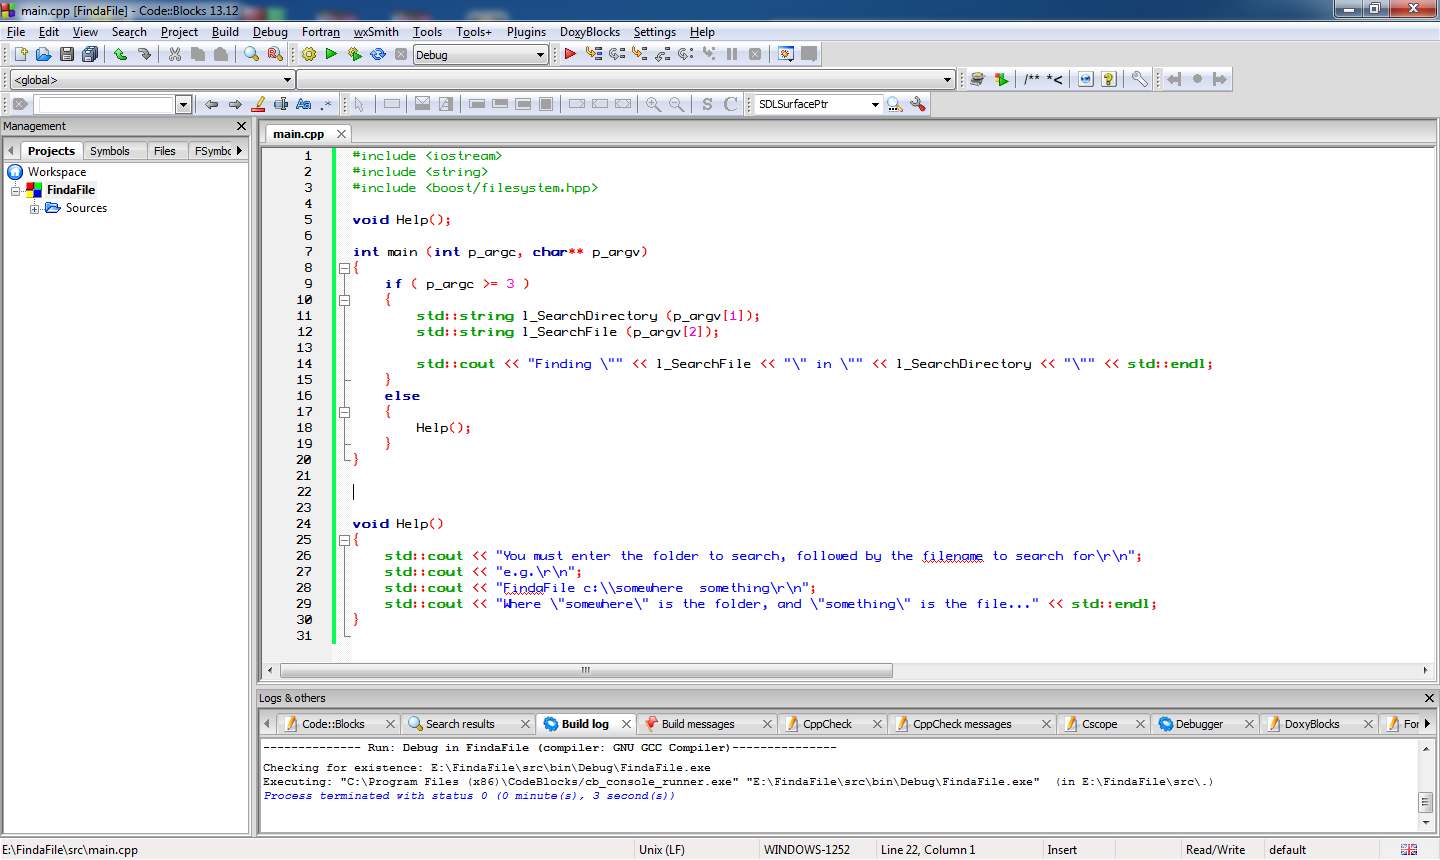
Lets write some code to take a directory to search and a file to search for at the command line and just output them, as a starting point....


We can go into "Project" on the menu to set the parameters for the program to some useful values... I have added a "Help" function already to point out when a mistake is made... I am going to just check my code by running it without parameters, then with bad parameters and finally with a valid folder name & filename... The targets I am using is "C:\Code" a folder I know exists, and "Program.cs" to look for all the program C# files I have in that folder...

Lets see our program output at this point...


Our first calls to the boost library now are going to turn the search directory string into a path, which is easier to work with in the boost library, you don't have to perform this step most all the boost filesystem library functions will automatically cast strings or cstrings or wstrings you pass to them into boost::filesystem::path or wpath instances on the fly, however, it's in the long run quicker for your code if you convert them into paths once, rather than have the library create and throw away instances of paths over and over as you do various calls.

We will also need to check that the search directory is indeed a directory to start off from...


Next we need to iterate through the directory and for each file check if its name is a match... I am going to put this into a function straight away, so we can call  into the function whenever we meet a sub-folder we can automatically queue if for searching as well....


And the code for this Search Function looks like this:

void SearchDirectory(const boost::filesystem::path& p_Directory, const std::string& p_Filename)
{
    std::cout << "Searching [" << p_Directory << "]...\r\n";
    std::cout.flush();


    auto l_Iterator = boost::filesystem::directory_iterator (p_Directory);

    // A blank iterator is the "end" point

    auto l_End = boost::filesystem::directory_iterator();           


    for ( ; l_Iterator != l_End; ++l_Iterator)

    {
        // This is the type "boost::filesystem::directory_entry"
        auto l_DirectoryEntry = (*l_Iterator);  


        // Look for subdirectories, files or errors....

        if ( boost::filesystem::is_directory(l_DirectoryEntry) )
        {
            // Recurse down into the sub tree
            SearchDirectory(l_DirectoryEntry, p_Filename);
        }
        else if ( boost::filesystem::is_regular_file(l_DirectoryEntry) )
        {
            std::cout << "Found File... [" 
                << l_DirectoryEntry.path().string() << "]\r\n";


            // We need to just have


            // Regular files are NOT symlinks, or short cuts etc...

            // So we look for a match!
            if ( l_DirectoryEntry.path().filename().string() == p_Filename )
            {
                // Notice here that we call to get a "path"
                // and then a "string" from that path!
                std::cout << "!!!! Match Found [" 
                     << l_DirectoryEntry.path().string() << "] !!!\r\n";
            }
        }
        else
        {
            // Unknown directory or file type
            std::cout << "Error, unknown directory entry type\r\n";
        }
    }


    std::cout.flush();

}

You will notice we receive a "directory_entry" from the "directory_iterator", then we get the "path" out of that, and finally the "filename" from that path... We can output any of them along the way, but we only compare the filename with the search pattern.

If the "directory_entry" was found to be a directory itself we simply recurse into another search.

This code now works....


This completes this little tutorial, if you found it of some use, please follow the blog, if you really really liked it and want to help me develop more ideas, or suggest more ideas, the donate button and e-mail link are at the top right!

Good Luck!