When I say not working, I do not mean the function does not work, of course it works. What I mean is that left to it's on devices the GCC compiler can actually chose to not perform a memset in certain circumstances, you can read more detail about this in the official bug list.
So, what's going on? Well, I have a piece of code which uses a common buffer, each function locks a mutex (std::lock_guard), fills out the buffer and then transmits over USB to target devices, crucially I then want to clear the common buffer.
The purpose of this architecture is to keep sensitive information being transmitted through the buffer present for as little time as possible (i.e. the time between filling out and transmit, ~35ms) rather than filling out, transmitting and leaving the data in the buffer; as the time between calls may be anything up to 5 seconds, plenty of time for someone to halt the program and inspect memory dispositions.
In pseudo code therefore our sequence looks something like this:
COMMON BUFFER [256]
CLEAR BUFFER
USB CALL:
FILL BUFFER
USB TRANSMIT
std::memset(BUFFER, 0, 256);
In debug this worked no problems, all my soak testing worked, I was quite happy.
Until one switches to release, whereupon the GCC compiler can opt to optimise away calls which it defines as not having any noticeable effect.
In the case of the memset call here, to the compiler, locally sees nothing inspect the BUFFER variable after the memset is performed, it therefore decides nothing is bothered the buffer is cleared or not.
Of course we know the next call to any call, or the same call, will rely on the BUFFER being empty when it enters.
There are therefore two problems, if one had this code:
USB CALL:
std::memset(BUFFER, 0, 250);
FILL BUFFER
USB TRANSMIT
std::memset(BUFFER, 0, 256);
You would of course pass all your tests, even in release, the buffer would work as expected, you could even assume no data is being left in RAM between transmit calls; you'd be dead wrong, but you can assume anything you like really. No, what's happening here of course is that the lead-in memset is clearing the buffer before use, but the sensitive data is left in the buffer between calls as the latter memset is still being optimised away.
The code remains vulnerable to introspective intrusion attempts.
The real solution? Well, I've gone with:
USB CALL:
std::memset(BUFFER, 0, 250);
FILL BUFFER
USB TRANSMIT
std::memset(BUFFER, 0, 256);
auto l_temp(buffer[0]);
buffer[0] = buffer[1]
buffer[0] = l_temp;
Whatever you do to solve this, don't spend a whole day as I just have.
In conclusion, of course the call works, it's the compiler which is optimising the call away.
Showing posts with label GCC. Show all posts
Showing posts with label GCC. Show all posts
Sunday, 25 February 2018

Thursday, 2 November 2017
C++ : Ignored qualifiers (-Wignored-qualifiers)
What is an ignored qualifier? Well, in a class, lets have a student class:
#include <string>
class Student
{
public:
const std::string Name;
private:
bool m_Present;
public:
Student(const std::string& p_Name)
:
Name(p_Name),
m_Present
{
}
void SetPresent() { m_Present = true; }
void SetAbsent() { m_Present = false; }
};
Now, we may want to access the present flag, therefore provide a function to do so:
bool Present() const { return m_Present }
This function is telling the user of our class quite a bit, it tells them that the return type is boolean and that the calling of this function makes no changes to the class contents (const trailing the parameter list).
However, for me, this isn't quite right, I believe that we want to inform any user that the boolean returned is also constant, it does not change unless you alter the internal value with the "Set" functions, therefore I prefer and like to see code stating:
const bool Present() const { return m_Present; }
This is perhaps overkill and most of the time completely acceptable code to present, however, some might prefer not to see it, specifically anyone defining "-Wignored-qualifiers" as with the "const bool" the const here is technically superfluous, the return type is boolean and a new instance of it, it is not a reference to the internal value, if it were the function may look something more like this:
const bool& Present() const { return m_Present; }
Now we are intrinsically returning a reference to the internal boolean, or even:
const bool* const Present() const { return &m_Present; }
For speed of operation we may directly drive the reference back as a constant boolean constant pointer.
I find this much more informative to the user, they know our intent, the code though more verbose communicates its meaning much more clearly.
As ever, yes I have seen questions asked of interfaces where "bool X()", or "bool X() const" is provided but then programmers have asked "How do I change X", with the const return, ignored qualifier or not, the know not to ask this function to change X and can look up elsewhere in your API.
#include <string>
class Student
{
public:
const std::string Name;
private:
bool m_Present;
public:
Student(const std::string& p_Name)
:
Name(p_Name),
m_Present
{
}
void SetPresent() { m_Present = true; }
void SetAbsent() { m_Present = false; }
};
Now, we may want to access the present flag, therefore provide a function to do so:
bool Present() const { return m_Present }
This function is telling the user of our class quite a bit, it tells them that the return type is boolean and that the calling of this function makes no changes to the class contents (const trailing the parameter list).
However, for me, this isn't quite right, I believe that we want to inform any user that the boolean returned is also constant, it does not change unless you alter the internal value with the "Set" functions, therefore I prefer and like to see code stating:
const bool Present() const { return m_Present; }
This is perhaps overkill and most of the time completely acceptable code to present, however, some might prefer not to see it, specifically anyone defining "-Wignored-qualifiers" as with the "const bool" the const here is technically superfluous, the return type is boolean and a new instance of it, it is not a reference to the internal value, if it were the function may look something more like this:
const bool& Present() const { return m_Present; }
Now we are intrinsically returning a reference to the internal boolean, or even:
const bool* const Present() const { return &m_Present; }
For speed of operation we may directly drive the reference back as a constant boolean constant pointer.
I find this much more informative to the user, they know our intent, the code though more verbose communicates its meaning much more clearly.
As ever, yes I have seen questions asked of interfaces where "bool X()", or "bool X() const" is provided but then programmers have asked "How do I change X", with the const return, ignored qualifier or not, the know not to ask this function to change X and can look up elsewhere in your API.
Thursday, 4 May 2017
Software Engineering : My very bad way to set up makefiles
I may have wrote this post, but I'm just being lazy... Read on.
I've made other Boost videos, and other codeblocks videos, and I've always assumed that the user at the other end was well aware of how to compile & build code.
I've made other Boost videos, and other codeblocks videos, and I've always assumed that the user at the other end was well aware of how to compile & build code.
However, it seems there are lots of users whom are not aware of how you actual create a program from source code, at least not with C++.
So I'm going to show you the absolutely mostwrong basic way of creating and using a makefile to perform a build...
So I'm going to show you the absolutely most
The first step of C++ program creation, is that trivial matter of creating the source code, easy right?... Yep, so lets skip that step, and go to when its once and we want to pass the code through a compiler, the compiler turns the source not into a program, but into an intermediary format called an object file or object code.
The compiler then leaves the process and another program takes over, this second program is known as the Linker, and it takes the object code and links it with all the system calls and other libraries you are wishing to use.
There are other steps involved in the process of building a program, however, compiling & linking are the two main steps; when I began programming you were made very much aware of this by the compiler and linker generally being such large complex programs and the libraries being so big you had to physically change floppy disk between the different steps of the process.
This process was also taught to me in school & later college, it was common practice to understand a compiled program was actually compiled then linked.
Unfortunately, this knowledge seems to have fallen in to the way side, it is of course more important to learn how to program than be bogged down in minutia, however, once you have learned I strongly believe you should expand your knowledge and really have a holistic knowledge of the craft of programming.
So, back to our program, the make file, what might they look like? Well they are simply text files, which contain commands very similar to bash script... We call this make file script by passing it to the "make" program, you can get make for Linux, mac or alongside MinGW for windows.
Lets start writing a make file for any basic C++ program, which links the Boost libraries we've built somewhere on disk, and which looks like this:
#include <iostream>
#include <string>
#include <boost/filesystem.hpp>
int main (int p_argc, char** p_argv)
{
if ( p_argc > 1 )
{
std::cout << "File or Folder ";
std::string l_pathString(p_argv[1]);
boost::filesystem::path l_path(l_pathString);
if ( boost::filesystem::exists(l_path) )
{
So, back to our program, the make file, what might they look like? Well they are simply text files, which contain commands very similar to bash script... We call this make file script by passing it to the "make" program, you can get make for Linux, mac or alongside MinGW for windows.
Lets start writing a make file for any basic C++ program, which links the Boost libraries we've built somewhere on disk, and which looks like this:
#include <iostream>
#include <string>
#include <boost/filesystem.hpp>
int main (int p_argc, char** p_argv)
{
if ( p_argc > 1 )
{
std::cout << "File or Folder ";
std::string l_pathString(p_argv[1]);
boost::filesystem::path l_path(l_pathString);
if ( boost::filesystem::exists(l_path) )
{
std::cout << "Exists!";
}
else
{
std::cout << "Not Found";
}
std::cout << std::endl;
}
}
Save this as "main.cpp" and then define a variable called "FILES" into which we place this filename.
FILES=main.cpp
We want to start our make file with a variable which contains the compiler we wish to use, for Linux on my test machine I'll use "g++".
}
else
{
std::cout << "Not Found";
}
std::cout << std::endl;
}
}
Save this as "main.cpp" and then define a variable called "FILES" into which we place this filename.
FILES=main.cpp
We want to start our make file with a variable which contains the compiler we wish to use, for Linux on my test machine I'll use "g++".
CC=g++
So now we have a value called "CC" which is a string of characters with the value "g++". The dollar sign indicates that "CC" is a variable within the script, which we might want to use later, I use these kind of variables throughout makefiles so I can place at the top any paths or references I like, or I can alter them when I move the makefile from Linux to say Windows, without needing to change hundreds of places throughout the script, I can change just one location.
I find this working with strings is 95% of what working with makefiles is about, next in the file we then define the strings for where to find both the boost headers and the binary libraries are...
BOOST_INC=/home/xelous/boost
BOOST_LIB=$(BOOST_INC)/stage/lib
Notice, I create the root folder for boost as one variable, and then in the next line I use that variable to extend into the "stage/lib" folder, so I never duplicate the root folder for the boost libraries.
We can now define at least our build command, slightly different the command is a verb, in this case "build", which is the command we will use here, but which is also the default. If you save this makefile as "makefile" in a folder, then navigate your console to that same folder and type "make", the make program will look for "makefile" by default, find it and build the "build" verb by default!
build:
$(CC) -I$(BOOST_INC) -L$(BOOST_LIB)
So, what is this command doing? Well it is saying to use the compiler, with the Include folder for boost and look for libraries in the boost library folder we've set.
The "-I" and "-L" parameters are the same parameters one would use on the command line for "g++". This command therefore equates to "g++ -I/home/xelous/boost -L/home/xelous/boost/stage/lib", but I think you will agree it is somewhat easier to manage.
We also need to tell the program to link against some libraries, and that we want them linked statically in this case. So our next variable will be called "CFLAGS1" to pass the Compiler flags to the command. Back at the top of our make file I therefore add....
CFLAGS1=-fpermissive -Wl,-Bstatic
This file tells the compiler to be permissive of some common errors and treat them as warnings. You can use whatever parameters you wish for your compile, the flags available and their meaning are quite varied, however you will need to use a second set to within the build command, so lets define that now....
CFLAGS2=-static-libstdc++ -std=c++14
The second tells the compiler and linker to link against the static versions of the libraries we select later, you will need to look at the boost invocation pages in order to go back over our previous posts and build boost static and take advantage of this option.
I'm not going to explain static linking here, nor any of the other switches, available.
Now we're linking the C++ standard library, and boost, statically we need another variable with the list of libraries to link, on the command line to g++ this is with the "-l" (lowercase L), except with we are going to make the program threaded, so we can set up a new makefile script variable called "LIBS", into which we set the libraries, like so.
LIBS=-pthread -lboost_signals -lboost_system -lboost_filesystem
We now have the compiler, the folders, the libraries, the flags... What about the target file for the build?... Well I want it to be an executable called "fredrick".
TARGET=-o fredrick
Now we need to put this all together into a command, just running the script with the variables does nothing, we need to define a verb... Lets call this "build" a verb in the makefile has to have a colon following it...
build:
And we can tell make what to perform for a build:
build:
$(CC) -I$(BOOST_INC) -L$(BOOST_LIB) $(CFLAGS1) $(FILES) $(CFLAGS2) $(LIBS) $(TARGET)
We might also want to clean the project, so we'd want to delete the target file maybe, by adding another verb:
clean:
rm $(TARGET)
We can then perform the call "make build" or "make clean" in the folder with this makefile and perform our build.
A bit rough and ready, but it works to get you up and running.
We might also want to clean the project, so we'd want to delete the target file maybe, by adding another verb:
clean:
rm $(TARGET)
We can then perform the call "make build" or "make clean" in the folder with this makefile and perform our build.
A bit rough and ready, but it works to get you up and running.
Monday, 19 December 2016
Programming : Using Boost File System Directory Iterator to Find a File
PLEASE NOTE, THIS POST CONTAINS UPDATES TO PREVIOUS POSTS - BOOST 1.62.0 NO LONGER TAKES THE "MinGW" DIRECTIVE, TO USE MINGW YOU NOW ONLY NEED PASS THE "GCC" DIRECTIVE; see section 5.2.2 at this link...
Today I'm going to do some code, this is a code example with Code::Blocks using the Mingw compiler on Windows, to build the boost libraries and then use the boost.filesytem library to find a specific file from a given root, first just looking in that directory at all its files and the finally making it recurse down the tree of files.
First things first, lets create a folder to work in, I'm going to call it "FindaFile", inside this I'm going to create "ext" for external items, which is where I'll place & build boost; and I'll create "src" for source which is where our project file & source code will reside... Lets get started...

Next...

Extract the boost library, I happen to be using 1.62.0, which is the current version at the time of writing... And I then need a command prompt which knows the location of the compiler for mingw (i.e. we've added it to the PATH environment variable)...

We're preparing to build boost with the mingw toolset...


And then performing the boost build, which on this machine is going to take a long time as I only have 2gb of RAM... Hit that donate button to help me improve some of my machines!

So the path was set, the bootstrap is performed:
bootstrap gcc
and then I start the build
b2 toolset=gcc

Once the build is complete the two folders we will be using in our code-blocks project are the "boost" folder within the boost_1_62_0 folder; this contains all the header files for the boost library. Some of the libraries are header only, so just including this folder into your builds (on gcc with "-I /foldername/") is enough to use boost, items like "lexical_cast" are perfect examples of this.

The other folder is the "/stage/lib" folder, this will contain all the build library binary's. When you are using the file system it is not a header-only library, you must link against the "boost_filesystem" library file, and this is where it will reside!
You can leave the boost build running and open Code::Blocks now...

And create a new project, with a little bit of normal code, to check everything is working & we have set it to use C++11 (I would like to use a newer C++, but I only have this old compiler installed)....


Now, lets set the build options in the project...

I am going to set C++11, all warnings and stop on fatal errors...

Then I am going to set the compiler to look in the boost folder for the headers...

And now we tell the linker were to look for the libraries....

Our final step is to tell our program to use the filesystem library, when doing this you also need to use the system library... So lets switch to the linker settings and insert those libraries...
Now, the file name we are going to add is:
libboost_system-mgw47-mt-d-1_62.a
Lets break this down, from left to right we are told the this is part of the boost library "libboost" that is is the "system" sub-library, that it was build with "mingw v4.7", that is it the multi-threaded library, that it is built "debug" and it came from boost v1.62... You need to know this, because in our previous pages you will see we ONLY set our search directories and settings for the "Debug" version of the project... When you switch to the clean, smaller, faster "Release" build you will need to set everything again!
We add this library then into the linker settings, within the link library section... We need to add this file and the filesystem file...

The IDE might ask you to add the library as a relative path, this is directly pointing to the file, and I personally do not advise this, as we've set up the "search directories" we need only enter the filename into the library list.
Now, once the boost build is completed in the background, we can use the boost file system library in our code, and check for the presence of a file....

Lets write some code to take a directory to search and a file to search for at the command line and just output them, as a starting point....
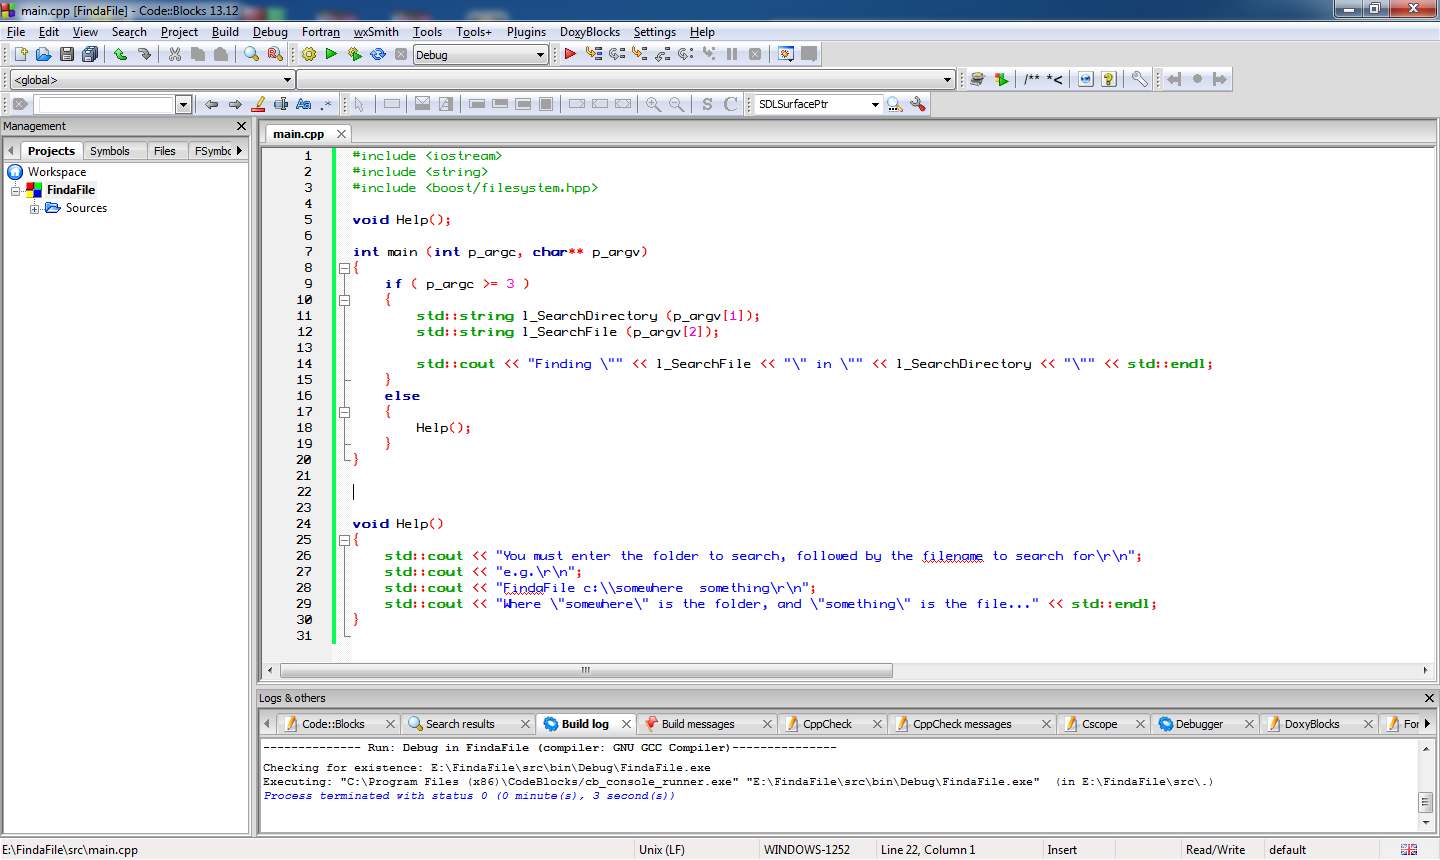
We can go into "Project" on the menu to set the parameters for the program to some useful values... I have added a "Help" function already to point out when a mistake is made... I am going to just check my code by running it without parameters, then with bad parameters and finally with a valid folder name & filename... The targets I am using is "C:\Code" a folder I know exists, and "Program.cs" to look for all the program C# files I have in that folder...
Lets see our program output at this point...

Our first calls to the boost library now are going to turn the search directory string into a path, which is easier to work with in the boost library, you don't have to perform this step most all the boost filesystem library functions will automatically cast strings or cstrings or wstrings you pass to them into boost::filesystem::path or wpath instances on the fly, however, it's in the long run quicker for your code if you convert them into paths once, rather than have the library create and throw away instances of paths over and over as you do various calls.
We will also need to check that the search directory is indeed a directory to start off from...

Next we need to iterate through the directory and for each file check if its name is a match... I am going to put this into a function straight away, so we can call into the function whenever we meet a sub-folder we can automatically queue if for searching as well....

And the code for this Search Function looks like this:
void SearchDirectory(const boost::filesystem::path& p_Directory, const std::string& p_Filename)
{
std::cout << "Searching [" << p_Directory << "]...\r\n";
std::cout.flush();
auto l_Iterator = boost::filesystem::directory_iterator (p_Directory);
// A blank iterator is the "end" point
auto l_End = boost::filesystem::directory_iterator();
for ( ; l_Iterator != l_End; ++l_Iterator)
{
// This is the type "boost::filesystem::directory_entry"
auto l_DirectoryEntry = (*l_Iterator);
// Look for subdirectories, files or errors....
if ( boost::filesystem::is_directory(l_DirectoryEntry) )
{
// Recurse down into the sub tree
SearchDirectory(l_DirectoryEntry, p_Filename);
}
else if ( boost::filesystem::is_regular_file(l_DirectoryEntry) )
{
std::cout << "Found File... ["
<< l_DirectoryEntry.path().string() << "]\r\n";
// We need to just have
// Regular files are NOT symlinks, or short cuts etc...
// So we look for a match!
if ( l_DirectoryEntry.path().filename().string() == p_Filename )
{
// Notice here that we call to get a "path"
// and then a "string" from that path!
std::cout << "!!!! Match Found ["
<< l_DirectoryEntry.path().string() << "] !!!\r\n";
}
}
else
{
// Unknown directory or file type
std::cout << "Error, unknown directory entry type\r\n";
}
}
std::cout.flush();
}
You will notice we receive a "directory_entry" from the "directory_iterator", then we get the "path" out of that, and finally the "filename" from that path... We can output any of them along the way, but we only compare the filename with the search pattern.
If the "directory_entry" was found to be a directory itself we simply recurse into another search.
This code now works....

This completes this little tutorial, if you found it of some use, please follow the blog, if you really really liked it and want to help me develop more ideas, or suggest more ideas, the donate button and e-mail link are at the top right!
Good Luck!
Monday, 31 October 2016
Software Engineering : "warning: defaulted and deleted functions only available with -std=c++11"
warning: defaulted and deleted functions only available with -std=c++11 or -std=gnu++11
When you're using std=c++14??!?!?! What the heck is going on here?
I've noticed this strange bit of behaviour with g++ and warning when compiling with multiple cores... I've stripped this example back to the bare minimum, so lets just define what we're building and then we'll look at the strange warning which comes out, first of all, we need to compile two files, completely independent of one another:
Main.cpp
#include <iostream>
int main ()
{
std::cout << "Hello World" << std::endl;
}
This is our first file, the other has to be a class:
Data.h
#ifndef DATA_HEADER
#define DATA_HEADER
#include <string>
namespace Xelous
{
class Data
{
private:
std::string m_Data;
public:
Data(const std::string& p_Data);
const std::string& GetData() const;
};
}
#endif
And the code for this class looks like this:
#include "Data.h"
namespace Xelous
{
Data::Data(const std::string& p_Data)
:
m_Data(p_Data)
{
}
const std::string& Data::GetData() const
{
return m_Data;
}
}
This code so far is all fine, however, in our data header we don't want the default constructor, so we're going to just delete the default constructor, like this:
#ifndef DATA_HEADER
#define DATA_HEADER
#include <string>
namespace Xelous
{
class Data
{
private:
std::string m_Data;
public:
Data() = delete;
Data(const std::string& p_Data);
const std::string& GetData() const;
};
}
#endif
Fairly simple stuff so far, and no problems, no errors... However, I always build with "pedantic", especially as I get closer to release and I'm looking at code, so lets see my build file for the above project:
CC=g++
STD=c++14
WARNINGS=-Wall -Wfatal-errors
PEDANTIC=-pedantic
OUTPUT=example
MAIN=main
DATA=data
CompileMain: ${MAIN}.cpp
${CC} -std=${STD} ${WARNINGS} ${PEDANTIC} -c ${MAIN}.cpp -time
CompileData: ${DATA}.cpp
${CC} -std=${STD} ${WARNINGS} ${PEDANTIC} -c ${DATA}.cpp -time
Lets just stop there, and look what we have in the build file so far, we have the compiler, the STL version to use, the warnings, we're using pedantic and I'm only compiling the two files, there's no linking going on.
I always prefer this so I can trap individual compile errors or problems, speeding up the over all development... Once I'm happy both classes or files are clear I can then combine them into their link, by adding:
Link: ${DATA}.o ${MAIN}.o
${CC} -o ${OUTPUT} ${DATA}.o ${MAIN}.o -time
This will link everything up...
There isn't a problem with this code, we can save the file now and call "make" on those three targets and it will work fine... Let us just complete the make file:
clean:
rm -f ${DATA}.o
rm -f ${MAIN}.o
rm -f ${OUTPUT}
clearscreen:
clear
all: clean clearscreen CompileData CompileMain Link
These last three targets are our clear, a simple clear screen and then the "all" target,

So, we can now "make all" and see this output:

Building one after the other is fine, however, if I use "j2" that is to make it build data and main on different cores at the same time, then link the result of both you get the above error:

Both compiles are being sent to the compiler with c++14, when we're using serial single focus compilation there is no warning, yet with two the warnings pops out?
I've actually run out of time on this very busy Sunday to look into this any further at the moment, I'm therefore going to schedule this for tomorrow and let it loose on the world...
Subscribe to:
Posts (Atom)