Showing posts with label cheap. Show all posts

Wednesday, 3 January 2018

Ultra Cheap ZFS Array

Make your own ZFS array (mirrored) with USB Flash drives, for cheap!


Since this... interesting post of mine... has only about 10 views, and my tech items usually get a few hundred, I figure somewhere along the lines it got trampled by my silly New Years post....

Sunday, 31 December 2017

Using Flash Drives in ZFS Mirror

This post comes from an idea I had to allow me to easily carry a ZFS mirror away from a site and back again, we didn't need much space - only 5gb - but it had to be mirrored in triplicate, one copy to stay locally, one going into a fire safe on site and the third to be carried by the IT manager off-site each evening.

The trouble?  A near zero budget, so for a little over £45 we have a 14GB ZFS mirrored pool, across three 16 GB USB Flash drives and one three port USB 3.0 hub.

It was perfect for the task at hand, extremely portable, and cheap, I thought the same approach may help anyone trying to get to learn a little more about ZFS, a student or even someone using a laptop as a small office server - as the laptop literally has its own battery back-up system built in!

It's not the fastest solution, its in fact extremely slow, but as an entry step it's perfect.

See the full video below, throughout the commands I list were in use...


Commands:

Listing Disks by ID...

ls /dev/disk/by-id

Listing Disks to a file for use in a file script as you see me using...

ls /dev/disk/by-id -1 > disks.txt

------------------

To install ZFS on Debian/Ubuntu linux:

sudo apt-get install zfsutils-linux

------------------

To remove & purge ZFS from your system:

sudo apt-get purge zfsutils-linux

(and you will be left with "/etc/zfs/pool.cache" to remove or back up yourself).

------------------

Command to create the pool...

sudo zpool create <Name> mirror <DiskId1> <DiskId2> etc...

The name we had here was "tank", if you already have data on these disks you will need to add "-f" to force this change through.

------------------

Command to make a file executable - like our sh script:

sudo chmod +x <filename>

------------------

Zpool Commands:

sudo zpool status

sudo zpool import <name>

sudo zpool scrub <name>

sudo zpool clear <name>


You will want to "import" if you completely remove ZFS or move one of your sticks to a new machine etc, simply insert the disk and import the pool by name.

Scrub will be used whenever you return a disk to the pool, remember the point here is to allow you to replicate the data across the three sticks and be able to remove one or two to safe keeping, be that an overnight fire safe, or taking a physical copy with oneself.

Clear is used to remove any errors such as the Pool becoming locked out for writing - which it may if a drive, or all drives are removed - you simply clear the current problem with any pool.


Summary:  Remember this is NOT the optimum way to run ZFS, this is actually extremely slow, you are replicating each write over your USB, you can only cache so much in the RAM, but it is not a performance piece, this is about ensuring one replicates data for safe keeping, a small office or your dorm room server setup could be completely provided by a laptop in this manner, it has it's own battery backup, it is quite (if you get the right machine) and really this is a very cheap way to play with ZFS before you move onto other bigger hardware options.  Plus, I find the best way to learn about technology is to break it, even a little, and so constantly breaking down your pools by pulling USB sticks out of them is an excellent opener to recovering your pools.  Play about first, don't put anything critical on there until you're really happy with the results.

For an excellent post covering creating ZFS pools, cheak out programaster's post here: http://blog.programster.org/zfs-create-disk-pools

And for the official ZFS documentation you can check things out with oracle here: https://docs.oracle.com/cd/E26505_01/html/E37384/toc.html


Oh, and Happy New Year... I guess I made it to 100 posts this year...

Friday, 29 December 2017

Windows Defrag v KingDian SSD... FAIL

I'm sure you all already know this one, and many vendor specific implementations of SSD drivers/applications prevent this... Not me though.

Yes, I have a dirty cheap (£27) SSD from KingDian in my Laptop... Wait, wait wait, stop abusing me!  This is just a boot disk to hold a local OS and some scratch space, all my storage is provided to this machine over NFS.
The trouble?  Well, in the late summer the wife and I had a few days away in deepest darkest Wales... Now this was a disconnected break, however, I couldn't resist taking the laptop loaded down with a few DVD based games and a steam download or two, plus I got to take some system code with me and a slew of PDF's I could read... I got a lot of work done, even without Linux (yes I had to flatten the machine back to Windows 7).

And I pretty much put the machine away until just before Christmas, I then needed it again, so flipped it out the cabinet and fired it up, only to immediately find the battery was dead... It had been dying, I rely on a meager source of dodgy, second party batteries from China... You know the kind of Lithium cells you'd not want to leave alone too long.

But being Christmas I was skint, so I've had to wait until the end of the month to get a new battery... Which arrived today, I left it to fire up and take it's first charge, everything looked fine, it was still Windows from the holiday, so I left it to it and I've been and enjoyed some TV...

Upon coming back up however, the machine is mental... Telling me I have no boot device, I had left the machine on... It has no network connection, so it can't have downloaded a Windows update and restarted... I was a little baffled... But fear not, I'm a trained professional...


This got us into a Windows Recovery, and after not giving a shit and starting normally, back into windows, where I started to puzzle out the problem....

Event Viewer, and Applications... Nothing but the panic about the non-clean reboot... System... Hmm... System shows the last event at 16:54 and then the reboot at 23:54 (alright, don't judge, I watched three films okay, and we had a take-away!)...

 So what was the event at 16:54... "Service Control Manager".... Hmm, which service.... "The Disk Defragmenter service entered the running state"...

OH SHIT... This is an SSD, you really shouldn't defragment them (it reduces their life)... So it tried to defrag and not only crashed windows, but made the device/bios not able to inter operate upon a warm restart.  That's quite a feat.

A hot reboot sorted everything, so I'll not dig any further, however, I'm interested in this phenomenon.  The disk is a cheap chuck away one, so I start the defrag manually... BOOM, crash, same thing.

I trawl through my box of bits and find an old OCZ 128GB SSD (which has about 26% life remaining - lol) and I throw Windows 7 onto this... Let it all set up and I come back (it's about 23:35 now, if anyone's counting).  Starting the defragger on the OCZ device, no problems.... It just does nothing, the management software from OCZ stops any nastiness.


Back to the KingDian, boot up.. .and Defrag... BOOM.

It's definitely something about the very cheap KingDian drive... Any ideas?  Drop it into the comments, but its back to Arch for this machine me thinks.

Tuesday, 15 November 2016

Administrator: ZFS Mirror Setup & NFS Share

I'm going to explain how to use some simple (VMWare emulated) hardware to set up a ZFS Mirror.  I'm picking a mirror, so they have 100% duplicates of the data.

I've set up the VM with a 4 core processor and 4GB of RAM, because the potential host for this test setup is a Core 2 Quad (2.4Ghz) with 4GB of DDR2 RAM, and it's perfectly able to run this system quite quickly.

The first storage disk I've added is a single 20GB drive, this is the drive we install Ubuntu Server 16.04 onto.


Then I've returned to add three new virtual disks each of 20GB.  These are where our data will reside, lets boot into the system, and install zfs... Our username is "zfs-admin", and we just need to update the system:

sudo apt-get update
sudo apt-get install zfs

Once complete, we can check the status of any pools, and should see nothing... "No pools available"


We can now check which disks we have has hardware in the system (I already know my system installed on /dev/sda).

sudo lshw -C disk


I can see "/dev/sdb", "/dev/sdc" and "/dev/sdd", and I can confirm these are my 20GB disks (showing as 21GB in the screen shot).

The file they have needs about 5GB of space, so our 20GB drives are overkill, but they've just had a data failure, as a consequence they're paranoid, so they now want to mirror their data to make sure they have solid copies of everything rather then waiting on a daily back up...

sudo zpool create -f Tank /dev/sdb

This creates the storage pool on the first disk... And we can see this mounted into the Linux system already!


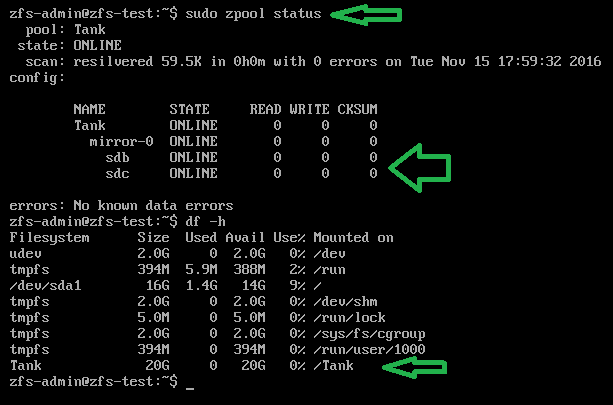
sudo zpool status
df -h

Next we add our mirror disk, so we have a copy of the pool across two disks... Not as fast as raidz but I'm going with it because if I say "raid" there's going to be "Raid-5", "Raid-6" kind of queries and I'm not going to jump through hoops for these guys, unless they pay me of course (hint hint)!


That's "sudo zpool attach -f Tank /dev/sdb /dev/sdc", which is going to mirror the one disk to the other... As the disks are empty this re-striping of the data is nearly instant, so you don't have to worry about time...

Checking the status and the disks now...


We can see that the pool has not changed size, it's still only 20GB, but we can see /dev/sdb and /dev/sdc are mirrored in the zfs status!

Finally I add their third disk to the mirror, so they have two disks mirroring the pool, which they can detach one from and go take home tonight, leaving two at work... It's a messy solution, but I'm aiming to give them peace of mind.


To detach a drive from the pool, they can do this:

sudo zpool Tank /dev/sdc

And take that disk out and home, in the morning they can add it again and see all the current data get put onto the drive.

So, physical stuff aside they now need nfs to share the "/Tank" mount over the network...

sudo apt-get update
sudo apt-get install nfs-common nfs-kernel-server
sudo nano /etc/exports

And we add the line:

/Tank 150.0.8.255 (rw,no_root_squash,async)


Where the IP address range there is the start of your IP, at home for me this would be 192.168.0.*.

Then you restart nfs with "sudo /etc/init.d/nfs-kernel-server restart", or reboot the machine...


From a remote machine you can now check and use the mount:


Why does this exist?
I think I just won a bet, a friend of mine (hello Marcus) about 10 years ago, I helped him set up a series of cron scripts to perform a dump of a series of folders as a tar.gz file from his main development server to a mounted share on a desktop class machine in his office.

He has just called me in a little bit of a flap, because that development server has gone down, their support had lapsed for it and he can't seem to get any hardware in to replace the machine for a fair while.

All his developers are sat with their hands on their hips asking for disk space, and he says "we have no suitable hardware for this"...

He of course does, the back up machine running the cron jobs is a (for the time) fairly decent Core 2 Quad 6600 (2.4Ghz) with 4GB of RAM.  Its running Ubuntu Server (16.04 as he's kept things up to date!)...

Anyway, he has a stack of old 80GB drives on his desk, he doesn't 100% trust them, but the file they have is only going to expand to around 63GB... So he can expand it onto one of them, the problem is he wants to mirror it actively...

Convincing him this Core 2 Quad can do the job is hard, so with him on the phone I ask him to get three of these 80GB drives, they're already wiped, and go to the server... Open the case, and let me ssh into it.

I get connected, and the above post is the result, though I asked him to install just one drive (which came up as /dev/sdg) and then I set that up as the zpool, then I asked him to physically power off and insert the next disk, where I then connected again and added it as a mirror.

In the end he has 5 actual disks, of dubious quality, mirroring this data, he's able to expand the tar.gz back up onto the pool and it's all visible with his developers again.

This took about 15 minutes... It in fact took longer to write this blog post as I created the VM to show you all!

Thursday, 14 April 2016

Project - Socket 771 to Socket 775 - Xeon Conversion

I've been conducting an experimental project, one I've seen all over the net by others, but which had lots of different information... This is the conversion of a socket 775 motherboard to a socket 771.

First of all, why?... Why would we do this?... Well, the socket 775 is a commercial socket, supposedly sold to us mere mortal customers who buy one machine and one CPU at a time, and the motherboards and processors in the class were/are quite expensive.

We're talking about the Core 2 era, Celeron D, Core 2 Duo, Core 2 Quad.  I remember the Core 2 Quad machine I put together was really rather expensive at the time.  So, between six and eight years on, we're retiring those machines; yet they cost us a lot of money, and despite depreciation rates we users can still make use of these machines.  They can be useful as render farm nodes for 3D or movie work, they can be used as servers, to host basic information, or upload/download points, even as firewalls.  All roles they can fall into easily.

I personally am going to be using the machine I've got as a quiet webserver, retiring a venerably serving Pentium 4 Prescott for this old Dell machine.

So, what is the base machine?

Well, it's a franenstein, the in-laws have had me build them a new machine, so they had an Intel D31PR motherboard holding a Celeron D 450, and one gigabyte of RAM, a totally unhelpfully slow machine.  Even they noticed it was extremely slow.

From my spares they had enough parts to basically rebuild their machine, which I did, and it left me with their old motherboard.  I wanted to upgrade the processor, expand the RAM and add a RAID array controller card, but my budget is extremely low, we're talking £20.

Well on Amazon, I can get a RAID controller card for £13.. This left me £7... Hmm.. Luckily, the IT Department at work were able to donate to me some old DDR2 RAM, so I had the maximum 4GB the board can handle.

£7... Upgrade the processor?.... A challenge... Ebay... Core 2 Duo's and Quads, going for over £25 a pop, most of the Quads were going for £30+.  Way out of the budget.

But there were dual core Xeons for around £4... And I saw this hack out there on the wires, so I set about working.

The first step is to strip everything down, clean it perfectly, and get a scalpel.  The first part of the modification is to remove the tabs from the processor, these tell the user which way to orientate the CPU for insertion, they do nothing else... A consumer CPU is orientated horizontally, so there are tabs top and bottom to stop you inserting the wrong CPU.

And the Xeon has gaps left and right, meaning it'll bounce off these tabs on the socket 775.


Taking the scalpel, I started to cut the tabs, now I DID THIS WRONG!  A much better approach is to leave the current CPU in there, with the tabs engaged into the socket 775 CPU, and then cut between the CPU and the edge of the socket.  So the CPU acts as a guide and the delicate socket pins are protected out of sight below the CPU.


And clean the cuts you make up.


Remove any debris...


Then you need to go back to ebay, and buy a Xeon Socket Modification sticker, this is a little sticker, which will cover two rows of connections on the bottom of the CPU, it will allow most of them to pass through the plastic, but two pins are headed with a little connector, and behind the sticker these connectors actually swap the two pins over.

So, two pins, and the orientation, that's all that's different about a Socket 771 and a Socket 775 CPU.


The stickers are bar shaped, so they indicate which pin to swap, but lay the CPU down with the notches to the top, and from the bottom count 10 connectors from the bottom right, moving left... Voila, stick it down carefully.

Insert into the Motherboard socket now, so the notches are to the "top" of the socket, add the heat-sink assembly, and build it back up on your work bench.


Now, some videos and advice says you need to go to sites, and download patches for your motherboard.  During my project here I've found most Intel brand motherboards do not need any patching, only third party boards.  It seems Intel include all the microcode for all their processors (this is only a guess, I have no proof other than using five different intel boards, and two none-intel boards and always having to patch the non-intel branded ones, whilst the intel ones just work).

Then powering on...


It worked, I've gone from a Celeron D 430 to a Xeon 5130.  They're very similar processors, but the Xeon has dual cores and a much faster FSB.


My YouTube play list, for my crappy videos covering this project can be found here: