Showing posts with label backup. Show all posts

Saturday, 10 October 2020

Twelve Drives Exit - Only Ten Drives Survive

 I've spent the morning doing a bunch of hard work, like using a surface compactor to lay a 60 meter gravel track... I was knackered come lunch, so I decided to have a play in the server world.

Now, some of you may know we're between properties at the moment, this means I had to take all my servers offline and move them.

However, I've been desperate to get the 32 core machine back online.

Booting up just now though and a couple of the drives had gone bad, like physically bad.  As such my ZFS pool was just a total write off, so I've decided to restore from my offline back up.  There's not actually that much data on that cluster, it was only running raid 2.... And with two disks dying in a simple move, I thought it better to go for raid3.


But remember folks, RAID is not a back up.  My important server is a triple mirror Zfs pool.  I can lose any 2 of the three drives over there, and they're brand new nice WD SSD's... plus the server is ONLY turned on for backups.

This serer is my scratch working/coding project server, on which I host my build slaves and nodes in network tests etc.

Tuesday, 15 November 2016

Administrator: ZFS Mirror Setup & NFS Share

I'm going to explain how to use some simple (VMWare emulated) hardware to set up a ZFS Mirror.  I'm picking a mirror, so they have 100% duplicates of the data.

I've set up the VM with a 4 core processor and 4GB of RAM, because the potential host for this test setup is a Core 2 Quad (2.4Ghz) with 4GB of DDR2 RAM, and it's perfectly able to run this system quite quickly.

The first storage disk I've added is a single 20GB drive, this is the drive we install Ubuntu Server 16.04 onto.


Then I've returned to add three new virtual disks each of 20GB.  These are where our data will reside, lets boot into the system, and install zfs... Our username is "zfs-admin", and we just need to update the system:

sudo apt-get update
sudo apt-get install zfs

Once complete, we can check the status of any pools, and should see nothing... "No pools available"


We can now check which disks we have has hardware in the system (I already know my system installed on /dev/sda).

sudo lshw -C disk


I can see "/dev/sdb", "/dev/sdc" and "/dev/sdd", and I can confirm these are my 20GB disks (showing as 21GB in the screen shot).

The file they have needs about 5GB of space, so our 20GB drives are overkill, but they've just had a data failure, as a consequence they're paranoid, so they now want to mirror their data to make sure they have solid copies of everything rather then waiting on a daily back up...

sudo zpool create -f Tank /dev/sdb

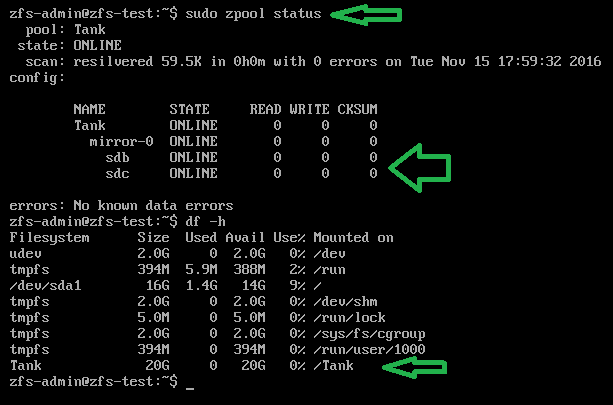
This creates the storage pool on the first disk... And we can see this mounted into the Linux system already!


sudo zpool status
df -h

Next we add our mirror disk, so we have a copy of the pool across two disks... Not as fast as raidz but I'm going with it because if I say "raid" there's going to be "Raid-5", "Raid-6" kind of queries and I'm not going to jump through hoops for these guys, unless they pay me of course (hint hint)!


That's "sudo zpool attach -f Tank /dev/sdb /dev/sdc", which is going to mirror the one disk to the other... As the disks are empty this re-striping of the data is nearly instant, so you don't have to worry about time...

Checking the status and the disks now...


We can see that the pool has not changed size, it's still only 20GB, but we can see /dev/sdb and /dev/sdc are mirrored in the zfs status!

Finally I add their third disk to the mirror, so they have two disks mirroring the pool, which they can detach one from and go take home tonight, leaving two at work... It's a messy solution, but I'm aiming to give them peace of mind.


To detach a drive from the pool, they can do this:

sudo zpool Tank /dev/sdc

And take that disk out and home, in the morning they can add it again and see all the current data get put onto the drive.

So, physical stuff aside they now need nfs to share the "/Tank" mount over the network...

sudo apt-get update
sudo apt-get install nfs-common nfs-kernel-server
sudo nano /etc/exports

And we add the line:

/Tank 150.0.8.255 (rw,no_root_squash,async)


Where the IP address range there is the start of your IP, at home for me this would be 192.168.0.*.

Then you restart nfs with "sudo /etc/init.d/nfs-kernel-server restart", or reboot the machine...


From a remote machine you can now check and use the mount:


Why does this exist?
I think I just won a bet, a friend of mine (hello Marcus) about 10 years ago, I helped him set up a series of cron scripts to perform a dump of a series of folders as a tar.gz file from his main development server to a mounted share on a desktop class machine in his office.

He has just called me in a little bit of a flap, because that development server has gone down, their support had lapsed for it and he can't seem to get any hardware in to replace the machine for a fair while.

All his developers are sat with their hands on their hips asking for disk space, and he says "we have no suitable hardware for this"...

He of course does, the back up machine running the cron jobs is a (for the time) fairly decent Core 2 Quad 6600 (2.4Ghz) with 4GB of RAM.  Its running Ubuntu Server (16.04 as he's kept things up to date!)...

Anyway, he has a stack of old 80GB drives on his desk, he doesn't 100% trust them, but the file they have is only going to expand to around 63GB... So he can expand it onto one of them, the problem is he wants to mirror it actively...

Convincing him this Core 2 Quad can do the job is hard, so with him on the phone I ask him to get three of these 80GB drives, they're already wiped, and go to the server... Open the case, and let me ssh into it.

I get connected, and the above post is the result, though I asked him to install just one drive (which came up as /dev/sdg) and then I set that up as the zpool, then I asked him to physically power off and insert the next disk, where I then connected again and added it as a mirror.

In the end he has 5 actual disks, of dubious quality, mirroring this data, he's able to expand the tar.gz back up onto the pool and it's all visible with his developers again.

This took about 15 minutes... It in fact took longer to write this blog post as I created the VM to show you all!

Saturday, 24 August 2013

Windows Reinstall Progress - Bowser Device?

Yeah, last night I started my windows reinstall, of course it started with a back up of lots of data.... Nearly 6,000,000 files later, I have moved a lot of stuff, I usually don't have this amount of files, but I had a server failure in 2011 and recovered the files to a folder creatively called "DesparateRecoveryNight"...

So, having spent hours copying these from the mail hard drive onto the two secondary drives I set about checking out why the system might be playing up, and I found a rogue piece of hardware, or at least a driver for something which I can neither say I own, nor identify...

This device was say in "Other Devices", listed as installed correctly and called "Bowser"...


No, not that Bowser - least I hope not, could he be after my 'shrooms? - but I don't have a device anywhere I remember coming in as Bowser... And of course searching the internet about it simply gives you references to the above dinosaur boss, or it gives you people whom have miss-spelt "browser", about which this was neither...

I disabled this device listing however, and a few (but not all) of the network problems I had been having stopped... And despite Windows all along reporting no use of network bandwidth, my router showed a 95% drop in out-going packets, I can only assume I've got a nasty at this point.

So I fire up a virus scanner - 1 result - but this was part of DirectX which always comes up as a false positive...

My plan going a heads is to scan all the other additional drives, reboot into my linux partition and back up that data, then reinstall Windows 7.

I'm on Vista 64bit so its time to retire it.  My laptop was the test for my new Windows 7 license, but its since been wiped over with Linux Mint... so my Windows 7 license is free for my mail gaming PC :)

Thursday, 17 January 2013

PC Overhaul


I've decided that with my main PC being down and out, I'm going to refurbish it.  Its two years of age, and though mighty powerful has come physical problems.

You may recall I fitted silent fans to the system, well one fan system which was never silent was the power supply unit, so I am looking at replacing that, I bought a quite powerful high spec unit (an OCZ 1000w unit), but I bought it for my prior machine my old Core2 Quad, apart from the case the power supply was the only unit I carried over into my Core i7 build.  So its time for an update.

I'm looking for a modular, constant, power supply giving a constant 850w or more, I'd like 1000w for surety and the possibility of adding a third graphics card into my SLi configuration later.

The other problem is, though I added the fans, and sorted the air flow optimisation it seems I also optimised how much dust would get pulled through the machine, so I'd like to look for some micro-mesh screens or filters to go between the case and the fans to filter out the junk on the inbound side of my air loop.  The trouble is, this might increase fan noise once again.


It'll also be a good chance to look at my storage options and update some of my drives, not least as I just had a Hitachi 320GB hard drive (stamped on top with the date of Oct 2007) die on me, I don't know whether it was taken out as part of the motherboard going down, or it itself contributed to the motherboard failure, all I can tell you is plugging it now results in hearing it clunk and it get very very hot very very fast.  Its on my desk wrapped in a big red plastic bag labelled DO NOT TOUCH ON PAIN OF SMOKE ALARM as we speak.

I may look at two small (32gb) SSD drives, as they're sub £30 now.  And just put the OS on that.  Then add a larger SSD drive to host games on my Windows boot, and add other hard drives to host the Linux portion of my data and virtual machines.

I do have dual USB 3.0 external facing ports on the rear of the machine (when connected to the motherboard supporting them) so I may also look at a pair of external USB 3.0 caddies, or purpose built drives, to hold my virtual hard disk images.  This is also the new part of my way of working, I'm going to start separating my data from my programs more thoroughly, I'm often adding new virtual drive images to my Virtual Machines.  You can even mount the same Virtual Disk Image (though not at the same time) on two different Virtual Machines, so I can create a new NTFS drive, create code on it on Linux, then check the same code cross compiles correctly on Windows.  A very useful trick.

Also backing up a single (or multi-part) VMDK file is easier to manage than having to back up the individual files being controlled for code, obfuscating the work I am doing by an added layer on my subversion server.  Using an encrypted virtual disk also means I can opt to carry the whole of my work around on a virtual encrypted compressed drive image, and keep working from any device mounting it, rather than worry about multiple files or backups or importantly fragmenting my work across multiple devices; how many times have you changed a file on one machine (say at the office) think you've submitted it to your server, then gotten say home and found its still on the machine at work, and you either re-do the edits at home on your working copy or you leave the work until the morning?... I do that on occasion and it annoys me as dead time.  Now, carrying my whole virtual drive, and leaving a back up at work, and a back up at home, I can sync the two easily and bring hundreds of thousands of code changes/work alterations with me wherever I am without the risk of missing X file of Y changes... There can be only one changed file, only one latest... the oldest dated disk image, simple.

So, those images on external USB 3.0 drives... I sense a plan coming together.

Tuesday, 1 May 2012

Backing up Subversion (Dump, Tar, BZ2)


One of the daily scripts I am running from my bash shell (as a cron job) is to back up my subversion repository in its entirety.

I have a huge drive, so there's no worries about space here, and I can move the daily back up off of my server when the weekly tape backup has a copy of the compressed files.

But, I thought I'd share with you all the script I'm using, as getting it just right, with the options to tar is with the date included is a bit fiddly... Anyway, without further delay, the script:


mkdir /var/tmp/daily
sudo svnadmin dump /svn > /var/tmp/daily/daily.svn
tar cjPf ~/daily_$(date +%Y%m%d).tar.bz2 /var/tmp/daily
rm -rf /var/tmp/daily


Now I can copy the resulting file wherever I want, its in my home directory as

"daily_20120501.tar.bz2"

Note the use of the c j P f in the tar, that's capitol P there... And the use of Y for year, month and day in the date formatter.


And that "/svn" is the source of my Subversion repository


To restore the file into a clean repository just install your server again, extract the daily you want, so you have a "daily.svn" and run the command:


sudo subversion load /svn < /daily.svn


Again, where /svn is the repository path and /daily.svn can be the full path as you extracted the file.

Hope this is useful.